You may not know what to do if your Keurig 2.0 is idle for a week or more, and you should read How To Empty Keurig 2.0 Internal Tank In A Quick Guide!
If you own a single-cup brewing machine such as, Keurig 2.0, then you most likely have a built-in tank to store your coffee grounds and brew another cup of coffee. If you look inside your machine, you will see a plastic cup with a handle above it. This is the tank. The tank holds about one and a half cups of coffee. When you fill your tank with coffee and close the valve, air is unable to enter the tank and as a result, it becomes almost full. Once the tank is almost full, the machine will then alert you by sounding an alarm and displaying a red exclamation mark on the screen. At this point, you must empty the tank or you risk having a bad brew the next time you use your machine. Follow these steps to empty your Keurig 2.0 internal tank.
Table of Contents
Why Do You Need to Empty Keurig 2.0 Internal Tank
Inside the Keurig machine, there are interior water tanks and tubes that you can’t see from the outside. If you’re going on vacation or switching coffee machines, be sure to clean out all of the leftover water inside your Keurig before storing it in a garage or shed; otherwise freezing might occur and damage other parts of your machine.
How Often Do You Need to Empty Keurig 2.0 Internal Tank?
The good news? You don’t need to drain your Keurig all the time if you use and clean it regularly. That’s because you’re moving the water through the tanks and tubes. It doesn’t have a chance to grow anything scary, and regular cleaning and descaling take care of anything that does start to build up.
But if you’re going to leave your Keurig for weeks or months, it may be a good idea to drain it.
Related: How to Clean Hamilton Beach FlexBrew Coffee Maker
What tools you will need?
The tools needed for this method include needle-nose pliers, a Phillips screwdriver, and a plastic syringe. The time needed to complete this method is from 15 to 20 minutes.
How to Empty Keurig 2.0 Internal Tank: (Step By Step Guide)

This is quite a long method, but it’s easy to Empty Keurig 2.0 Internal Tank if you want to keep it for storage purposes. You’ll need to check its manual because the components of the machine vary depending on where they are placed. Once you have thoroughly examined their design, then proceed with this method.
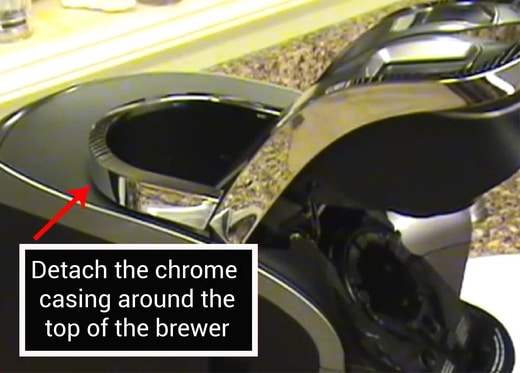
Step 1. Detach the chrome ring behind the pod assembly
In Step 4 you’ll remove the top of the brewer, but you can’t do that until you remove the ring shown below. It’s fastened to the top of the brewer by five snaps and can be removed by pushing in and up with a little force.
Step 2: Remove the 6 screws from the bottom of the brewer
Ultimately you’ll remove the entire front and side paneling of the coffee maker. To do that, you’ll need to remove the bottom.
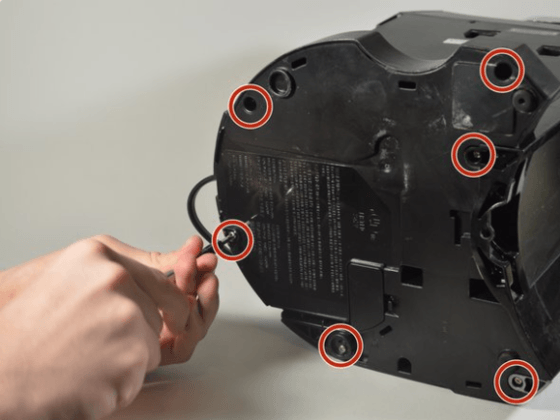
Use a Phillips-head screwdriver to remove the 6 screws (or however many are on your Keurig 2.0 brewer).
Step 3: Remove the front of the brewer
With the bottom removed, it’s time to detach the front of the brewer.
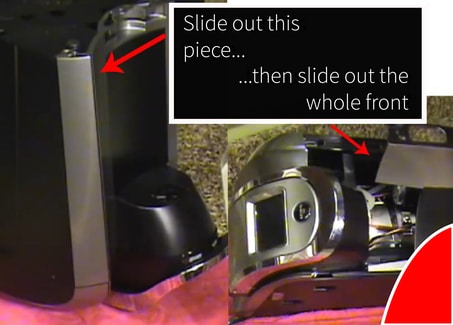
If your model has the silver plastic piece show on the left in place, remove that first. Once you’ve removed that piece, slide out the front panel in a similar manner.
This is attached with hooks that need to be pushed laterally before being pulled out. You may have to apply a considerable amount of force – especially when the front panel on the right has been hooked.
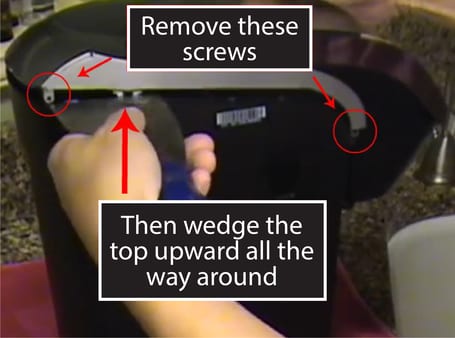
Step 4: Remove the screws on the top of the water reservoir side, then remove the top of the machine
Remember when you removed the chrome collar in Step 1? That comes into play here.
Turn the brewer to the water reservoir side and locate the two screws near the top. Remove these screws with a Phillips-head screwdriver.
Once removed, the only thing holding the exterior of your machine together is some plastic snaps. Use a flat object like a spatula to wedge between top and side of brewer and begin to pry it upwards. You may need to use some force! Work your way all around until entire top has been separated.
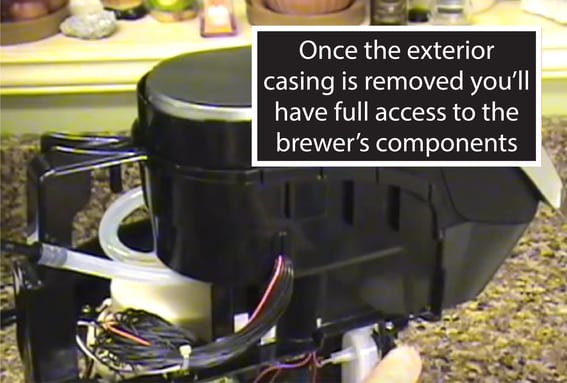
Step 5: Remove the exterior wrapper to expose all internal components
The only thing obscuring your full access to the brewer’s internal components is the exterior case wrapping around the sides and back. It’s affixed to the base of the machine with plastic snaps. With some force, unsnap the exterior from the base to remove it.
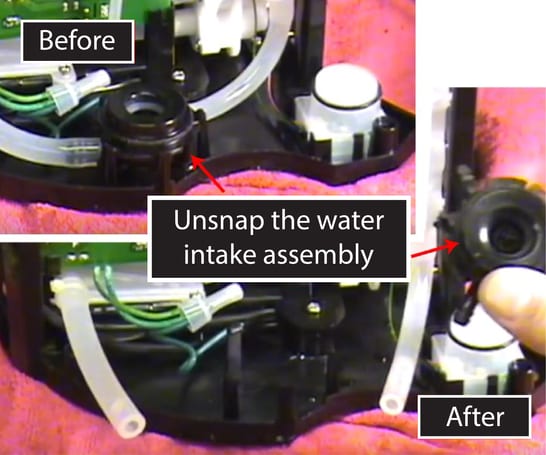
Step 6: Unclip the water intake assembly and drain it
Now it’s time to begin working on the machine’s inner components.
First, remove the water intake assembly by disconnecting the two tubes attached to it. They’re held on by plastic barbs.
Once removed, press the middle of the black intake piece to drain. Give it a good shake to get as much water out as you can. When done, set this piece aside.
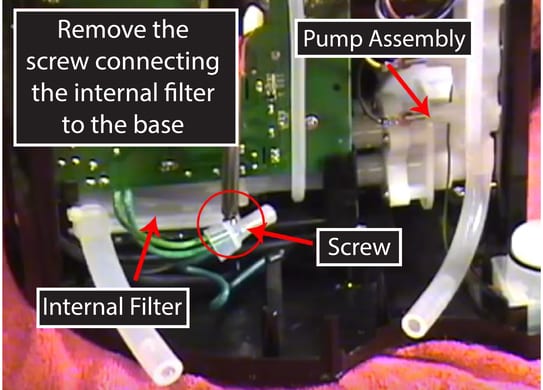
Step 7: Remove the screw near the base of the motherboard, freeing the internal filter
There are two screws holding the entire water tank, pump, internal filter contraption together.
This is the first screw.
Locate the screw at the base of the green motherboard and use your Phillips-head screwdriver to remove it.
Note: The screw being removed here is a little smaller than the other screws removed to this point. Keep it separate so you know which it is.
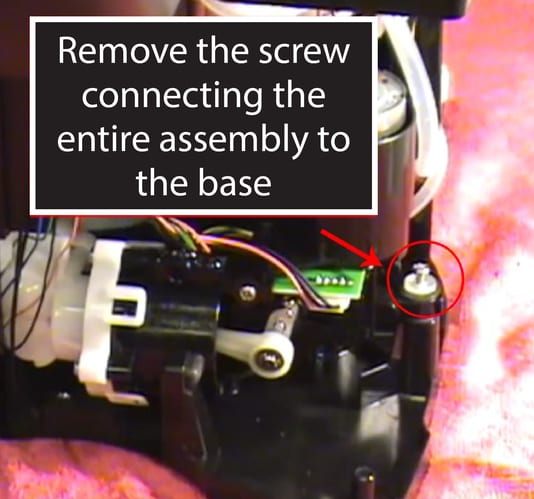
Step 8: Remove the single screw holding the water tank and pump assembly to the machine
Rotate the brewer around and locate the last remaining screw connecting the entire water tank, pump, internal filter assembly to the base. It has a white plastic washer.
Remove this screw using your Phillips-head screwdriver. Once removed, gently slide the whole assembly outwards to unhinge it.
Be careful not to damage any of the wires!
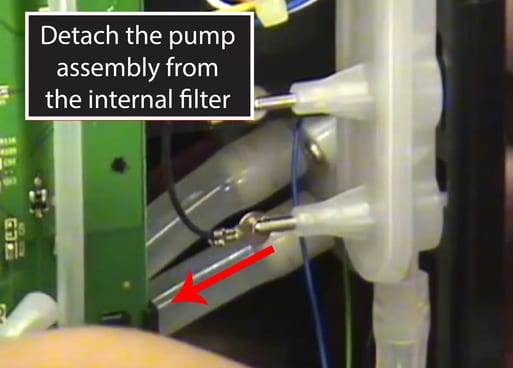
Step 9: Detach the filter from the pump assembly and drain the filter
With all internal components freed from the base, it’s time to start detaching them one by one to drain the stored water.
First, separate the internal filter from the pump assembly by gently (but firmly) detaching the silicone tube indicated in the image below.
Water will begin to drain out.
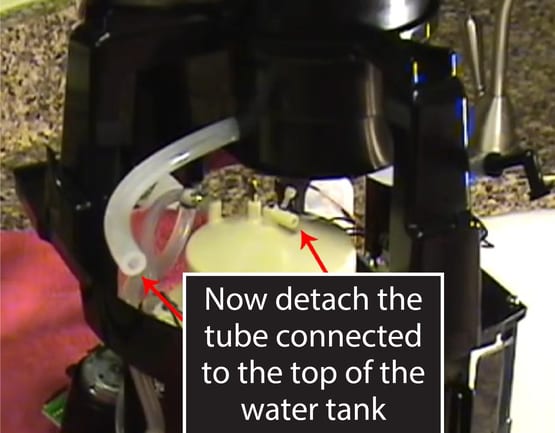
Step 10: Detach the tube on the top of the water tank
Before draining the water in the tank, remove the tube connected to the top. This will allow air in to displace the water draining out the bottom.
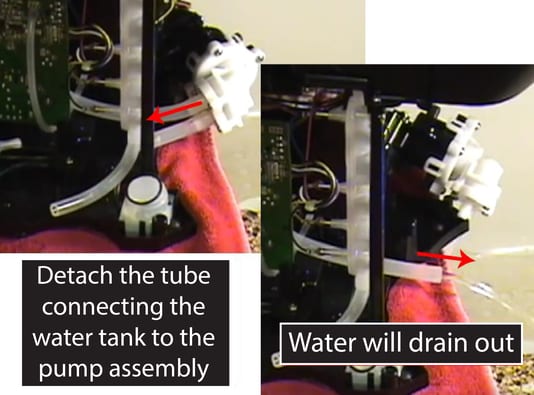
Step 11: Finally, detach the tube leading from the pump assembly to the water tank
After 10 tedious steps, it’s finally time to drain the brewer!
Detach the tube connecting the water tank to the pump assembly. Water will immediately begin flowing out of the tube, so be ready to direct it over a sink or into a collecting vessel.
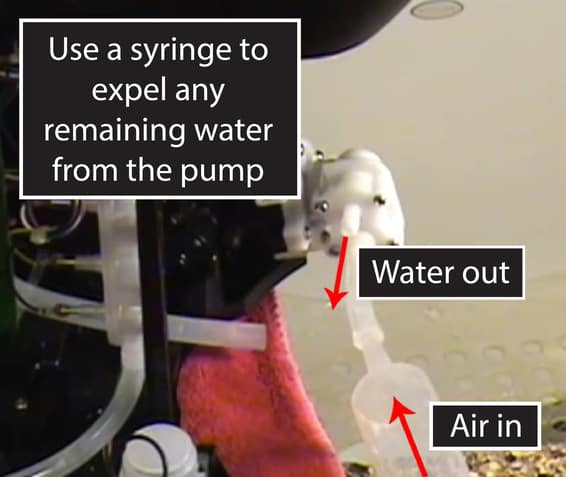
Step 12: Pump the remaining water out of the pump assembly (Optional)
Optional but encouraged, use a syringe to pump any remaining water from the pump assembly.
You’d be surprised how much water might be lurking in there.
If you don’t have one of these (I didn’t) you can find one at any pet store. They’re used to give doses of medicine. Here’s a bunch of cheap ones online.
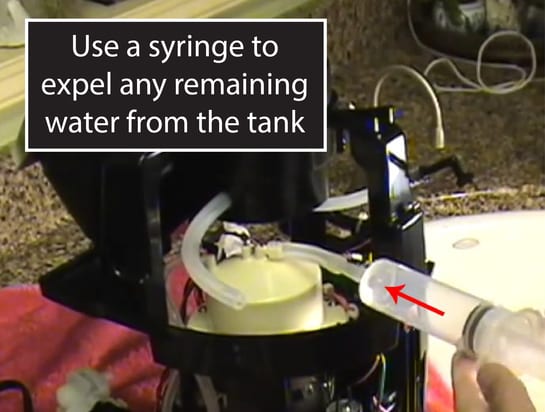
Step 13: Pump the remaining water out of the water tank (Optional)
Also optional but encouraged, connect the syringe to the top of the water tank to pump out any remaining water in the tank or lines.
Note: The plastic piece used to connect the syringe to the water tank was borrowed from the pump as seen in Step 12.
Step 14: Reassemble the machine
Congrats! You’ve successfully drained water from your Keurig 2.0 brewer’s internal components. It is now safe to store your machine.
How do I drain my Keurig 2.0 without disassemble?
- Remove the water tank from your Keurig and empty it out
- Replace the empty tank onto your Keurig and reach down for a little plastic disc
- Pull the disc up along its path until you get to the top of the track near the top of tank.
- Hold the disc in place with your finger or use some tape to fix it inplace (the disc floats up as you fill water and tells the Keurig how much water is in them).
- Brew the largest size of coffee you can (with or without a K-Cup, it’s up to you if you’d like to sneak in a drink or just empty the brewer)
- The machine will brew from the internal water tank and empty it out.
- You’re done! You can now unplug your machine and put it away for storage
How to Drain a K-Slim or Keurig Rivo:
Do you own a Keurig K-Slim or Rivo? These simple coffee makers don’t have internal water reservoirs, so they’re much easier to drain. All you need to do is empty the external reservoir!
Brew Like A Pro!
After following these steps, your machine will be empty, clean, and ready to brew another cup of coffee. However, if you want to brew a stronger cup of coffee, you can always repeat this process. Just follow the same steps, but add more coffee to the tank and wait for it to brew. Once you have brewed your stronger cup of coffee, pour it out and follow these steps again. Keep repeating this process as many times as you like.
Conclusion
Now that you know How To Empty Keurig 2.0 Internal Tank, you will never have to worry about running out of coffee again. You can enjoy a cup whenever you want without having to worry about it running out. If you are feeling ambitious, you can also learn How to Make Cheap Coffee Taste Better.
Frequently Asked Questions
How do I get the water out of my Keurig internal tank?
Step 1: Make sure the brewer is powered off and plugged in. Step 2: Place a mug on the drip tray to catch any water that may be drained. Step 3: Check if there is still water left in the cold tank, then lift up on brewer handle to drain any residual into hot tank.
How to Clean Keurig Water Reservoir?
If you have a removable tank, take it out and wash it with some mild dish soap and a sponge. For deeper cleaning, mix equal parts water and vinegar, then rub the brewing cycle with this solution for about 3-5 minutes before washing again in freshwater.
Why Does My Keurig Say Add Water but It is Full?
In case this happens, you need to wait for the water in your tank to cool down, or empty the reservoir and start from scratch.
What Should I Do if My Keurig Won’t Pump Water from Reservoir?
If your Keurig won’t pump water through, try turning it off and then back on again after a few minutes. If that does not work, empty out the tank and descale the coffeemaker and clean the needle.
Related Post: